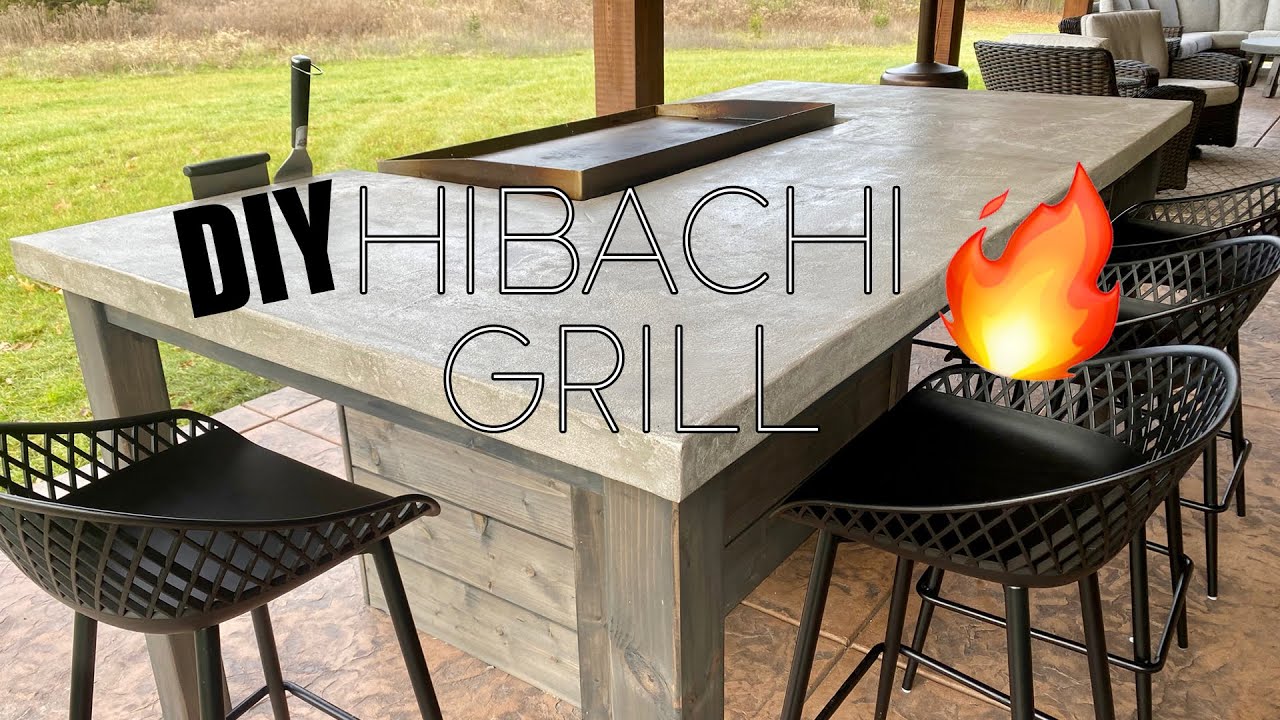
You decided to create your own outdoor Hibachi grilling table with a concrete top and a 5-burner griddle from Pit Boss. This DIY project turned out to be the perfect addition to your back porch, accommodating around 5 people comfortably. The tabletop was an experiment, with a skim coat of concrete instead of a full pour, providing a unique touch to the project.
Partnering with Pit Boss, you built three walls to encase the griddle, using treated lumber for moisture resistance. The process involved covering the tabletop with cement board, applying joint tape, and skim coating with quick set recat concrete. For the finishing touch, tintable deck stain was used on the raw wood, providing a waterproof finish. The final product, complete with a magnet for storing utensils and counter-height bar stools, is set to be a hit in your backyard.

Overview of the Project
If you have ever wanted to create your Hibachi experience with a griddle, this project is for you. The idea for an outdoor Hibachi-style grilling table has been on your mind for some time, and now you have the opportunity to bring it to life. With the perfect space available at your in-laws’ place, you decided to embark on this exciting project. Partnering with Pit Boss, they sent you their new 5-burner griddle, ideal for this endeavor. Griddles are gaining immense popularity due to their versatility in cooking and easy cleanup, producing less smoke than traditional grills. This project involves a counter-height table that comfortably accommodates about five people, with the potential to seat up to eight. Opting for a concrete top with a skim coat rather than a full pour added an experimental touch to the overall design. The project came together beautifully, becoming the perfect addition to enhance your back porch.
Building the Grilling Table Structure
For this project, the first step involved building the structure to hold the griddle securely. Constructing three walls to encase the griddle served as the foundation of the table. Using 2×4 treated lumber for the walls ensured resilience against moisture, ensuring the longevity of the structure. The table itself was built with sturdy 4×4 legs and 2×4 aprons, providing stability and support for the tabletop.
Creating the Concrete Tabletop
An experimental approach was taken with the tabletop, opting to lay down exterior-grade plywood as a base before covering it with cement board. Following this, joint tape was applied to the cement board, and a skim coat of quick-set recat concrete was used to complete the tabletop. This unique technique provided a durable and visually appealing surface for the grilling table.
Finishing the Wood Elements
Rather than traditional staining and waterproofing methods, tintable deck stain was chosen to finish the raw wood elements of the project. This allowed for a customizable stain color selection while providing a waterproof finish. Installing shiplap siding and capping the corners of the structure added a beautifully finished look to the wooden components.

Building the Grill Face Frame
The face frame for the grill was constructed using 1×6 boards and pocket holes for assembly. Applying deck stain to the face frame added visual appeal, and attaching it to the unit completed the design. This frame not only adds aesthetic value but also frames the grill securely within the structure.
Sealing the Concrete Top
To protect the concrete top from stains and damage, three coats of concrete sealer were applied. This sealer enhances the durability of the tabletop while providing a lustrous finish that is easy to maintain.

Modifying and Installing the Griddle
Modifications were made to the griddle to ensure a proper fit within the table structure. This included cutting the legs of the griddle and installing a 90° fitting for the gas line. Extending the grease tray chute was also necessary to direct grease into a drip pan efficiently.
Assembling Doors and Hinges
Creating doors with shiplap siding and using overlay hinges for installation added functionality and visual appeal to the grilling table. Additionally, installing a magnet for utensil storage on the side of the grill ensured easy access to cooking tools while utilizing the griddle.

Finding Counter Height Stools
To complement the counter-height design of the table, outdoor counter-height bar stools were purchased to provide comfortable seating for users. These stools were chosen for their durability and suitability for outdoor use.
Final Thoughts and Conclusion
Reflecting on the outcome of the project, you are thrilled with the results and look forward to enjoying the grilling table for many gatherings to come. The unique combination of materials and techniques used in this project has created a functional and visually appealing outdoor grilling space that is sure to be a hit with friends and family.
By following this comprehensive guide, you can recreate your own Hibachi-style grilling table with a griddle, adding a touch of excitement to your outdoor cooking experience. From selecting materials to finishing touches, each step contributes to the overall design and functionality of the project. Embrace the challenge, get creative, and enjoy the process of building your custom grilling table. Happy grilling!
