If you’ve ever dreamed of having an outdoor kitchen in your backyard, then this article is for you. In this video by QUIKRETE, you’ll learn how to build an outdoor kitchen using RumbleStone and QUIKRETE Countertop Mix. An outdoor kitchen is a great addition to any backyard, providing a focal point for cooking, dining, and entertaining all year round. Whether you want a simple design with just a barbecue grill enclosure or an elaborate setup complete with a built-in refrigerator and sink, RumbleStone and QUIKRETE have all the products and resources you need to bring your dream outdoor kitchen to life. The construction process is quick and easy, even for beginners, thanks to the mortar-less RumbleStone system that combines three sizes of building blocks stacked together and permanently bonded with QUIKRETE advanced polymer construction adhesive caulk. So why wait? Watch the video and start planning your very own outdoor kitchen today.
Building an Outdoor Kitchen with RumbleStone and QUIKRETE Countertop Mix
Building an outdoor kitchen can be a great addition to your backyard, providing a focal point for entertaining and expanding your cooking and dining space. Whether you envision a simple barbecue grill enclosure or a more elaborate design with built-in appliances like a refrigerator and sink, Pave Stone and QUIKRETE have the products and resources you need to bring your dream outdoor kitchen to life. In this article, we will guide you through the step-by-step process of building an outdoor kitchen using RumbleStone building blocks and a concrete countertop made with QUIKRETE countertop mix.

Choosing the Design and Materials
Before you begin your outdoor kitchen project, it’s important to choose a design that suits your needs and preferences. Pave Stone offers five standard modular designs of RumbleStone building blocks that can be customized to fit your specific requirements. Consider the size of your outdoor space, the number and type of appliances you want to incorporate, and any other features you desire.
In addition to the RumbleStone blocks, you will also need QUIKRETE countertop mix for the concrete countertop, construction adhesive for bonding the blocks, and other necessary tools and materials. You can find these products at your local home improvement store or online.
Measuring and Staging the First Course
Once you have chosen your design and gathered all the materials, it’s time to measure and stage the first course of RumbleStone corner blocks. Follow the design pattern and snap chalk lines on each side of the block wall as reference lines to ensure that your corners are square and your base walls are straight. This will provide a solid foundation for your outdoor kitchen.
To protect the surrounding concrete, use painters tape to secure plastic sheeting along the chalk lines on all sides. This will prevent any damage to the existing concrete while you work on building the outdoor kitchen.
Creating a Level Base
Concrete slabs are often sloped to allow for drainage, so it’s important to create a level base for your outdoor kitchen. This will ensure that your countertop is level and square. Start by placing the four corner blocks and using a four-foot-long level to check if the base slab is level in all directions. For longer distances, you can use a flat 2×4 along with the level to get a better idea of how high the corner blocks need to be set.
If the base slab is not level, set your four corner blocks using QUIKRETE sand topping mix at the proper height and make sure all corners of the block are level. The sand topping mix should be mixed to a workable consistency but firm enough to support the weight of a large RumbleStone block. Always wear waterproof gloves and eye protection when working with cement mixes.
Building the First Course of Blocks
With the base prepared and the corner blocks set, it’s time to start building the first course of RumbleStone blocks. Begin by laying about a half-inch bed of QUIKRETE sand mix along the inside of the perimeter chalk line. Place the next RumbleStone block according to the design diagram and adjust it to be even and level with the previous block. Check for levelness in all directions and ensure that the front edge of the block is aligned with the perimeter line.
Continue placing the RumbleStone blocks, checking that each block is level and aligned with the perimeter line. If necessary, tap the blocks with a trowel or rubber mallet to adjust their height. Consider the location of the electrical cord for the refrigerator and accommodate it by removing one of the RumbleStone minis from the pattern.

Applying the Construction Adhesive
The mortar-less RumbleStone system relies on QUIKRETE advanced polymer construction adhesive to bond each course of blocks together. This adhesive is environmentally friendly, solvent-free, and isocyanate-free. Cut the tip of the nozzle to allow a quarter-inch bead of adhesive to be dispensed, then apply the construction adhesive liberally across the entire course of blocks. One 10-ounce tube of adhesive can bond 19 lineal feet at a quarter-inch bead.
Once the adhesive is applied, begin placing the next layer of RumbleStone blocks according to the design diagram. Twist each block slightly to spread the adhesive and position it flush with the front of the base and against the previously placed block. Continue building the remaining courses, ensuring that each block is level and aligned.
Adding the Concrete Countertop
With the RumbleStone base complete, it’s time to add the concrete countertop. Concrete countertops are durable and beautiful, comparable to premium materials like granite and marble but at a fraction of the cost. Whether you pour the countertop before or after assembling the base, the process will typically take a few days to complete.
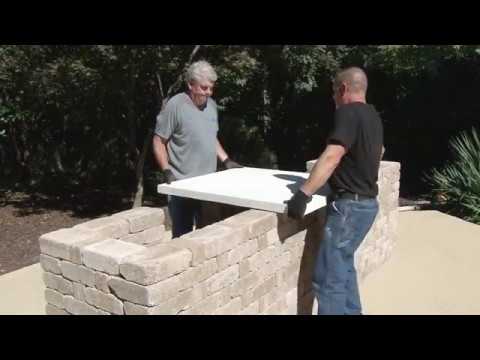
Concrete countertops are heavy, so it’s important to have at least two people to safely move and lift the slabs into place. Since the RumbleStone base is wide, no construction adhesive is necessary to hold the countertops in place. However, it is crucial to seal the countertops from the elements using QUIKRETE acrylic concrete cure and seal, a water-based semi-gloss clear acrylic sealer designed to protect the concrete surface.

Sealing the Countertop
After the concrete countertop has been installed, it’s essential to seal it using QUIKRETE acrylic concrete cure and seal. This sealer protects the countertop from water, dirt, oils, and grease, ensuring its durability and longevity. Apply the sealer according to the manufacturer’s instructions to ensure proper coverage and protection.
Assembling the Stainless Steel Base Cabinet and Grille
To complete your outdoor kitchen, you can assemble a stainless steel base cabinet and bolt a Bullet 5-burner grill to it. The grill is designed to fit perfectly within the 38 and a half inch module opening, while the 21-inch opening in the refrigerator module can accommodate most standard outdoor refrigerators. Carefully lift the grill into position, ensuring it fits snugly into the opening and is supported by flanges on both sides and the back. Slide in the stainless steel outdoor refrigerator into the opening, and your outdoor kitchen is complete!
Now that you have successfully built your outdoor kitchen with RumbleStone and QUIKRETE countertop mix, it’s time to invite your friends and family over for your next outdoor cookout. Enjoy the expanded cooking and dining space and the beauty and durability of your new outdoor kitchen!

